• Home
  • Classes
  • Inspiration
  • Favorite Things
    • Crafty Supplies
    • Taste Test Tuesday
  • Holidays
    • Valentines
    • St. Patrick’s Day
    • Easter
    • Mother’s Day
    • Father’s Day
    • 4th of July
  • Paper Crafting
  • About
  • Contact

Sunshine in my pocket

One stamp, Five Polar Bear Valentines!

January 11, 2018 Favorite Things, Paper Crafting, Valentines

These MFT Polar Bears have got to be a new favorite! If you follow me, you already know that I have a soft spot in my heart for bear stamps (of any kind!) so I can make cards for my Dad…it’s become a thing. So yeah, I collect all the bear stamps I can find that I think he might like.

This year, I purchased this set called “Polar Pals” from My Favorite Things. When I got it in the mail, my 3-year-old nephew was with me and when he saw them, he exclaimed “Oh, I love polar bears!” Then he ran off with my stamp set! Lol. So I thought I’d better make a Polar Bear valentine for him.

I ended up making FIVE different valentines, using this stamp set and Stitched Alpha dies as the common theme. Here they are!

xoxo-background-bear

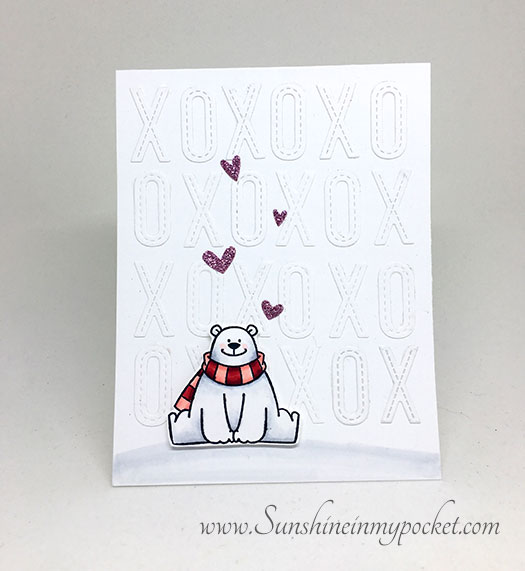
This was the card that started it all! I woke up one morning with the idea to have a bunch of Xs and Os in the background (white on white). Yes, I did quite a bit of die cutting that day!

xoxo-bear

Then, this cutie became one of the “Os” in this card. I colored up all the bears with Copic Markers. It may be hard to see…I used red glitter paper behind the die cut Xs and Os on this card, so it has a glittery pop!

bear-holding-heart

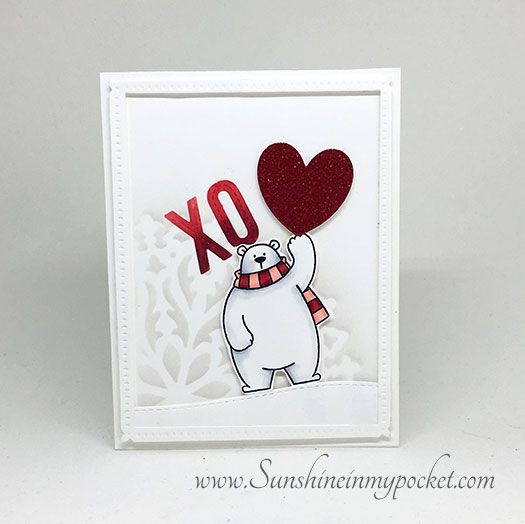
This one HAD to hold up a heart! So, using that same glitter paper, I die cut a heart for him. Added a couple Xs and Os colored with the same Copic colors as his scarf, and put him standing on top of a snowy hill. The stencil background is a favorite of mine from Penny Black. And that frame is a new favorite from Our Daily Bread Designs.

ice-skating-bear

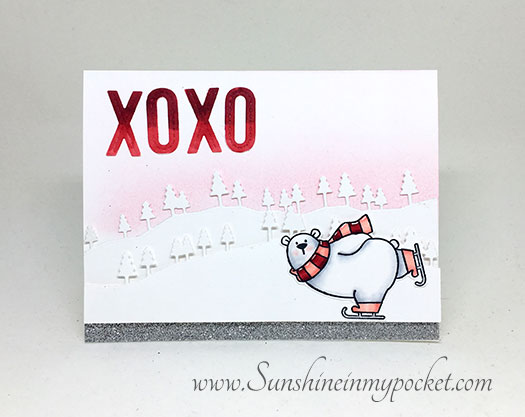
This ice skating bear has got to be one of my favorite images from the bunch. I love it when a stamp set includes great images….so great that you love them all! Here, he is skating on a silver glitter “pond” with trees and snow in the background. I popped up the trees in the forefront so there is some good dimension to this card. Those Copic Colored Xs & Os really pop on the pink inked background!

shaker-card

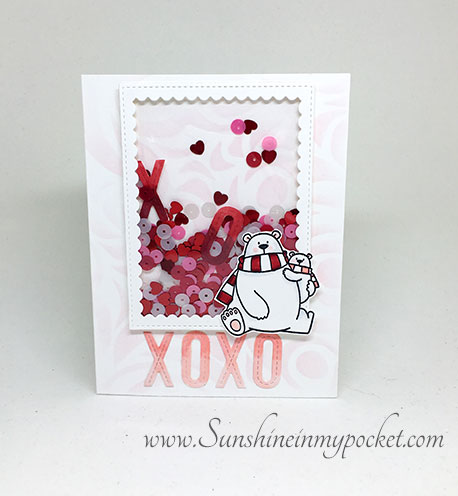
And of course I had to make a shaker card! The cutest little red heart sequins are inside, along with a Valentine mix of sequins sure to make the recipient smile (I hope)!

I really enjoyed thinking of different ways to make a Valentine card with one stamp set! I hope you enjoyed and got inspired to make some of your own. 🙂

May your days be filled with sunshine,
SHARE

Purple Onion Designs Surprise Blog Hop!

November 24, 2017 Paper Crafting

PObloghop

Welcome to the Surprise Bloghop for Purple Onion Designs! I have always loved these stamps and today I have a special holiday project to share with you (and a sale)!  To celebrate this weekend, Purple Onion Designs is offering 25% off all stamps in the shop here. Oh, I love a good sale!

There’s also prizes, stay tuned to see the details at the end of this post.

This first card project I’m sharing features some of my favorite characters:

po-holly-jolly-2

The penguin is Frost, that cute bunny is named Fawn, and I also used the Log and Tree (that comes in a set of three different trees). The sentiment is Holly Jolly.. I love the mix of script and plain text!

Here’s a closer look at just how sweet these characters are! Don’t they make you feel like smiling?

po-holly-jolly-close-up

Next is a tag featuring my all time favorite happy owl!

po-owl-tag

This is Flora and she’s just so happy! I love to color this stamp during the holiday season just to feel a bit of that joy… I used some striped washi tape for a more festive feel.

And the last project features my all-time favorite Santa:

po-Santa-card2

Isn’t he great!? He has such a kindness about him. I simply colored up Santa, added some Copic coloring, and some swirly snow with a white gel pen. Voila! That’s really all you need with this image because it is such a great size for a card (this is a regular A2 size: 4.25″ x 5.5″). Love it!

THE PRIZE:

In celebration of the hop, Sandy Allnock is giving away spots in a class of their choice to 3 lucky commenters along the bloghop – so be sure to comment everywhere! If the winner has already purchased a class during the current sale, that class fee can be refunded. Winner will be posted on Sandy’s blog on December 1, 2017. Good luck!

Here is the list of the hop! Your next stop is the talented Alice Wertz!

Sandy Allnock
Tracey MacDonald
Kelly Booth
Jessica Frost-Ballas
Sonja Kerkhoffs
Anna Lorenzetto
Sally On
Hannah Rubenstahl
Robyn Schultz
Simone Schwagler
Susen Srb
Nancy Thomas
Kari VanNoy  <— You are here!
Alice Wertz
Amy Yang
Vera Yates

Thank you so much for stopping by! I really appreciate your kind comments!

May your days be filled with sunshine,
SHARE

Mistletoe Greenery

November 15, 2017 Paper Crafting

Hello! Today I have a beautiful stamp to share with you…it’s called Mistletoe from Altenew and it is so fun to play with! It is a multi-layer stamp set, so you can use a variety of ink colors to make a beautiful image (no coloring required).

I have discovered my favorite green inks so far: the lighter green is Chirp Chirp from Waffle Flower, and the darker green ink is Fern from Simon Says Stamp. I am sure I will be using this combination many times this holiday season!

joy-with-greenery

I added the red berries using Distress Oxide ink and added some shading with Prismacolor Pencil. Then I used the JOY die cut from My Favorite Things to cut out a red glitter paper sentiment. I love how this came together.

I love the holiday season and I hope to get a lot of cards made this year. Do you send out holiday cards?

May your days be filled with sunshine,
SHARE

Big Bear Halloween Version, 4 ways

October 30, 2017 Paper Crafting

Hello! I have some fun Halloween cards for you using the “Boo” set from Waffle Flower, featuring one of my favorite characters: Big Bear! I use mostly Distress Oxide Inks to create these backgrounds and I really had a lot of fun!

This first one is the simplest to make: just stamp some black stripes for the background, color up your bear and pop him up using Scotch 3M foam tape! (This is my favorite and I buy it in a big roll!) I used the Plaid Play set to stamp these stripes in VersaFine Onyx Black ink.

halloween-bear-with-stripes

[Here I used Zig Clean Color Real Brush Markers to color the bear.] Then, I added the card panel to an orange card base, stamped the “Boo” sentiment in orange marmalade Distress Oxide ink and Voila! A cute Halloween card that didn’t take very long at all!

For the second card, I used the same stamp set, but got a very different look!

halloween-bear-with-cape

Oh, Big Bear, you look very cute with a cape! I just cut a small piece of felt in a “cape-like” shape and attached it to the car front using my favorite glue: Tombow Mono Multi glue. A little black twine tied in a knot makes it look like an official cape. Lol.

For the background, I used Distress Oxide Ink in Fossilized Amber, Spiced Marmalade, and Wilted Violet. (These are from the January 2017 Distress Oxide colors).  I added some die cut stars in silver glitter paper, and a moon shape and sentiment from the Waffle Flower “Reach for the Stars” set.

I love those ghosts in the corner!

My third card uses Distress Oxide ink in Spiced Marmalade to make a puff of smoke behind Big Bear. I cut my own mask in a smoke shape using Post-It Full Adhesive sheets, then inked on the orange color. Add some sparkly Stickles and White dots to create a magical look.

halloween-bear-with-orange

The background is made with Distress Oxides in Broken China and Faded Jeans colors and splashed with water droplets. I masked the bear first before this ink went on…it’s an *almost* one layer card! The Boo sentiment is heat embossed in white on a black strip of cardstock and adhered to the upper left of the card. I like the black card base for this one.

And my last card is one of my favorites…Big Bear flying over a graveyard!! (This grave stamp set is from My Favorite Things)

halloween-bear-with-gravestones

The Distress Oxides are wonderful for creating a background like this! I also inked on the gravestones using the Iced Spruce color. To get the granite-like texture on the gravestones, the Distress Spritzer is key! I used a few grey Distress Markers in the spritzer on the gravestones BEFORE I cut them out. Don’t they look cool?

For the stars in the sky, I used one of my favorite colors of Stickles: here. It creates a silvery/gold star in the sky! Just add some dots and they dry to a glittery perfection.

I hope you enjoyed these projects! I’d love to hear if you send out Halloween Cards. I have to say, that I don’t normally send Halloween cards, but when you have stamps as cute as these…now I love to make and send them!

Happy Halloween!

Affiliate links used when possible at no additional cost to you. Thank you for your support!


May your days be filled with sunshine,
SHARE

Christmas Wish List and Deals

October 27, 2017 Gift Ideas

It’s the most wonderful time of the year! Here are some shopping ideas for Stampers. I will continue to update this list for deals and sales! Enjoy.


  White Dividers to Organize Stamps
Avery Elle Stamp Storage Dividers
 Deco Foil  Transfer Gel
Darice Ultra Fine Applicator Bottle
 Birch Wood Paper
 Cherry Wood Veneer Paper
 Glossy Accents

May your days be filled with sunshine,
SHARE
  • « Previous Page
  • 1
  • …
  • 55
  • 56
  • 57
  • 58
  • 59
  • …
  • 120
  • Next Page »
oh hello
sign up
past posts
places i love button
Shop Scrapbook.com
Browse here! Shop Altenew

Shop Ellen Hutson

Like us on Facebook

Awards!

PS-Pro Button
 
 photo HonorableGnome_2013_zps29b8dd8c.jpg
sponsors
wendi lee photography button
sign up

HH Design Team


Photobucket

Instagram:

This error message is only visible to WordPress admins

Error: No connected account.

Please go to the Instagram Feed settings page to connect an account.

I'm going to Blended Conference in Tempe, Arizona in September 2013
THEME BY ECLAIR DESIGNS