• Home
  • Classes
  • Inspiration
  • Favorite Things
    • Crafty Supplies
    • Taste Test Tuesday
  • Holidays
    • Valentines
    • St. Patrick’s Day
    • Easter
    • Mother’s Day
    • Father’s Day
    • 4th of July
  • Paper Crafting
  • About
  • Contact

Sunshine in my pocket

Get Well Soon Bandages

August 17, 2018 Paper Crafting

Hello! Today I’m showcasing the bandage dies from Our Daily Bread Designs. I love these bandage dies…when you die cut them and then emboss them, they look like real bandages!

Here I used kraft paper to cut and emboss the bandages:

sunshine-ouch-bandge-card-new

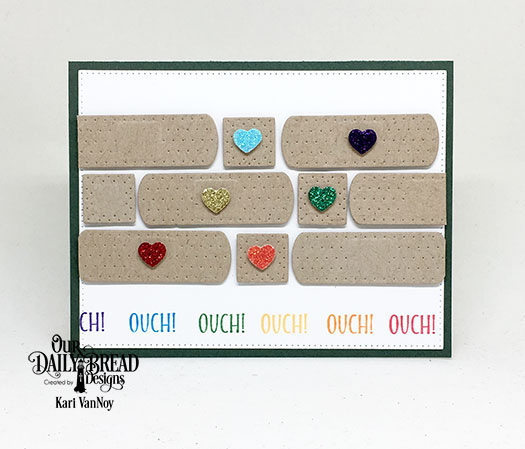
The “Ouch” sentiment is from the Get Well Wishes stamp set. (This stamp set is just full of great wishes!) I added some glitter hearts in rainbow colors to match the colors of sentiments. The heart die cut is from this set.

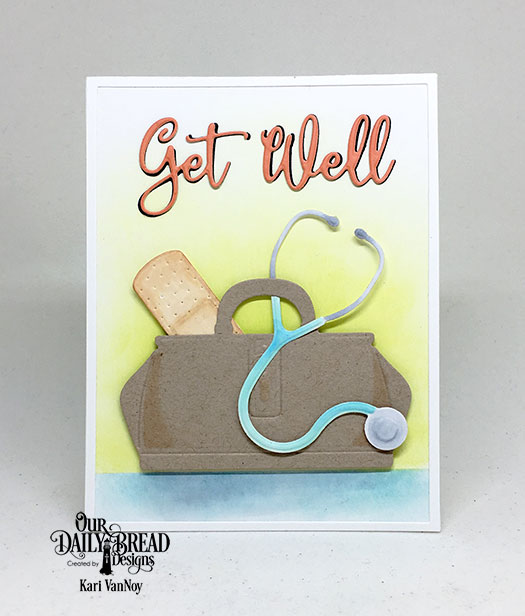
My next card, I die cut the bandage from white paper and then used my Copics in E30 colors to color them up. I love this look…I really feel like they look like the real bandages!

sunshine-plaid-get-well

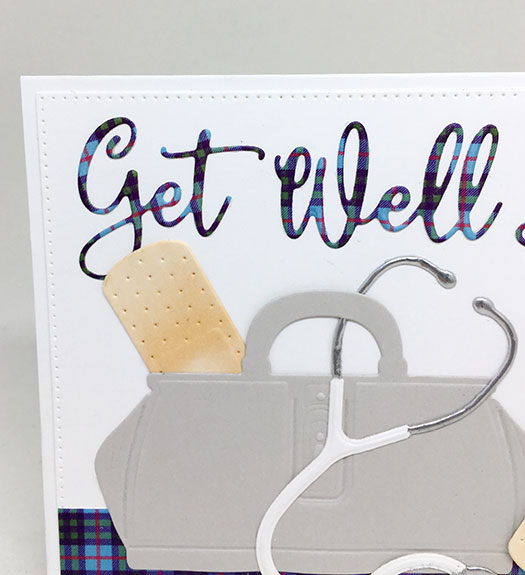
The stethoscope and doctor bag dies are now some of my favorites! I did use a bit of silver embossing powder on that stethoscope to give it a metallic look.

The plaid paper is from the Boho Bolds paper pad and I used this paper for the Get Well Wishes die, too! That is some good looking plaid… Here’s a little close up:

sunshine-get-well-close-up-on-plaid

I think this Get Well Soon die is such a great size! When you make a landscape card (like this one), it will all fit on an A2 size card (4.25″ x 5.5″).

When you want to create a portrait card, the Get Well Soon dies will also fit using only the first two words:

sunshine-get-well-bag-and-bandage

I hope you enjoyed this look at these dies from Our Daily Bread Designs. For more inspiration from the design team, be sure to visit the Our Daily Bread Designs blog! Thanks for stopping by.

May your days be filled with sunshine,
SHARE

Balloon Over London with Hedgehog Hollow

August 16, 2018 Paper Crafting

Hello! Today I have a card to share that I like to call “Balloon Over London” featuring the August Hedgehog Hollow subscription box.

I just couldn’t resist the idea of this little hedgehog floating over the London skyline at dusk. He’s on an ACTION WOBBLE (that came in the subscription box), so he moves and wobbles and it’s so cute!

balloon-over-london

I used Distress Oxides to ink up the background in the colors Fossilized Amber, Broken China, Faded Jeans, and Seedless Preserves.

I colored the images using the Marvy Watercolor pencils that came in the box, and then added detail and dots with markers and a white gel pen. Here’s a close up:

hedgie-closeup

Isn’t he cute?! I love this month’s box.

If you haven’t heard…there’s a sneak peek to next month’s Hedgehog Hollow box and it’s going to be featuring Catherine Pooler!! (So exciting!) If you haven’t tried Catherine Pooler inks, you are in for a treat…because one of her NEW ink colors is going to be included in the box! We will also be seeing some beautiful floral stamps and I just can’t wait to ink those up.

For more information about these boxes, visit The Hedgehog Hollow.

May your days be filled with sunshine,
SHARE

My Next Card Class is coming up!

August 10, 2018 Classes

Did you see?! The Unicorn Card Class is

almost here!

That’s right. The Unicorn Card Class for you and your Little (ages 5 and up) is coming up soon! And I can’t wait…

I have so much fun in store with lots of unicorns and some fun watercolor, colored pencil, and glitter pen techniques! And now, by popular demand…this class is coming true..

HERE’S A SAMPLE OF TWO UNICORN CARDS…

…that will be fun and easy for you and your Little one to color and assemble! Unicorns are so

popular right now and your small guest will enjoy spending time with you as they design their unicorn flower wreath, watercolor up a girl with her unicorn, and add glittery touches!

Sign Me Up

But that’s not all…

More Unicorns are on their way….

That’s right…there’s two more unicorn cards and they are a SURPRISE! I’ll show you a sneak peek in a few days, but know that they are beautiful and fun and filled with RAINBOWS AND UNICORNS!

Click here for all the details!

When is it?

It’s coming up on SATURDAY, August 18, 2018.

10 a.m. – 12 noon

at the Red Mountain Multigenerational Center
7550 E. Adobe Road
Mesa, AZ  85207-4702

I had so many requests to hold this class on a Saturday so moms could come and bring one of their favorite girls…and leave Dad home with the rest of the kids! So that’s what I scheduled.

What will you need to bring? Just liquid adhesive. I will have everything else you need!

Here’s two of my favorite liquid adhesives for cardmaking: here and here

I will have a few of the Lawn Fawn glue tubes available for purchase at class (they are $4.50 each). If you want one, email me to reserve one now!

(P.S. I know some of you have already signed up for class…thank you! You will receive a reminder email just before the class is here.)

Sincerely,

Kari VanNoy

Cardmaker and Creator

Click here to sign up!

May your days be filled with sunshine,
SHARE

Happy Smiles to you!

August 10, 2018 Paper Crafting

Hello! Today I’m showcasing a super fun new stamp set from Our Daily Bread Designs called Happy Smiles Stamp/Die duo.

This is a stamp set with the cutest teeth and the DIES to cut out those images! It’s also filled with lots of fun sentiments for Dentists, Dental Hygienists, Orthodontists, or anyone in the dental industry. I also thought these would be cute cards for kids who have lost a tooth!

Here’s my three cards I have to share today:

sunshine-2-teeth-keep-smiling

Aren’t these teeth so cute?! I love that they are holding toothbrushes with toothpaste on them! The rectangle dies I used on this card can be found here and here.

sunshine-braces-much-to-smile-about

This next card is a BRACES card! I love these braces…I used four sets to create this card (they come in a set of two teeth with braces holding hands). I though the blue thread was reminiscent of floss! Lol.

The sentiment is perfect for this one: “Thanks for giving me so much to smile about.”

sunshine-lots-of-teeth-happy-smiles

For this last one I felt compelled to color up different colors of toothbrushes! I used the Pierced Rectangles dies to create an interesting embossed background (this is one of my most used dies in my stash).

The banner die is from this set.

I hope you enjoyed these creations today. I have quite a few friends and relatives who are dentists, so I think they may appreciate these cards!

See you next time.


May your days be filled with sunshine,
SHARE

Coloring Hedgehogs with Watercolor Pencils

August 9, 2018 Paper Crafting

Hello! Today I am showcasing some products from the Hedgehog Hollow August 2018 box…and showing you just how easy it is to use those watercolor pencils from Marvy Uchida!

I found that watercolor paper works the best for these pencils, and you must use a very light hand when applying the color. If you just put a little color on at a time, you can build up the color slowly and you won’t get those annoying pencil marks that still show when you add water! *This is important!

Affiliate links used when possible. When you purchase through these links I receive a small commission that helps pay for blog costs. Thank you for supporting my blog!

I have a video to show you the techniques and how easy they are to use, once you have a few TIPS! Watch it here or on YouTube:

Here’s the tags I made using a wash of watercolor (from the pencils) and a hedgehog colored up with the watercolor pencils. It’s very easy to color them lightly, then keep adding color until you are happy with it. I used my favorite medium size Nuvo water brush to spread the pencil watercolor and I found it worked the best for me.

handmade-for-you-tags

The sentiment says “Handmade for you by me.” When I looked at photos of real hedgehogs, many of them had darker quills at the end. That is why I added a layer of black around the edges of the quills on these hedgehogs. Those cute hedgehog stamps come in the August box, and they are from La La Land Crafts! This is a new company to me and I’m really enjoying their stamps!

handmade-red-bag-hedgie

blue-tag-hedgie

You can see that I colored up these hedgehogs with a light hand. After I created these tags, I decided to move onto a watercolored card using the same pencils.

Notice the darker colors on the hedgehog below…you can keep adding color once the paper is DRY. This is another important tip…wait for the paper to be completely dry or you will get dark spots on your image that are almost impossible to blend.

wish-you-were-here-card

How cute is that traveling hedgehog? He’s in London! I added the British Flag to his balloon…and covered it in glossy accents. It did dry clear…here the balloon looks a little cloudy, I was too impatient to wait for it to dry fully!

I did add a bit of America to this card, too. Can you spot what it is?

Ok, I’ll tell you: the taxis in London are not normally Yellow! Nope, that’s an American coloring choice! They are normally black in London, I believe. Although I’ve never been to London. Have you?

I colored up Big Ben with a light tan and it’s not really coming across in this photo…but in real life it looks tan! I do like the watercolor painterly look of this “postcard.”

I hope you enjoyed these projects today and got inspired to try your watercolor pencils. It really is a fun and easy way to add color to your projects. Thanks for stopping by!

May your days be filled with sunshine,
SHARE
  • « Previous Page
  • 1
  • …
  • 45
  • 46
  • 47
  • 48
  • 49
  • …
  • 120
  • Next Page »
oh hello
sign up
past posts
places i love button
Shop Scrapbook.com
Browse here! Shop Altenew

Shop Ellen Hutson

Like us on Facebook

Awards!

PS-Pro Button
 
 photo HonorableGnome_2013_zps29b8dd8c.jpg
sponsors
wendi lee photography button
sign up

HH Design Team


Photobucket

Instagram:

This error message is only visible to WordPress admins

Error: No connected account.

Please go to the Instagram Feed settings page to connect an account.

I'm going to Blended Conference in Tempe, Arizona in September 2013
THEME BY ECLAIR DESIGNS