• Home
  • Classes
  • Inspiration
  • Favorite Things
    • Crafty Supplies
    • Taste Test Tuesday
  • Holidays
    • Valentines
    • St. Patrick’s Day
    • Easter
    • Mother’s Day
    • Father’s Day
    • 4th of July
  • Paper Crafting
  • About
  • Contact

Sunshine in my pocket

Every Flower Must Grow Through Dirt

July 15, 2019 Uncategorized

Hello! Today I have some very exciting news!! I’ve been accepted into the Altenew Educator Certification Program. I’m so excited about this and today I have my first card to share from my first certification class.

I was inspired by Yana in the Easy Die Cutting Techniques class. She had so many wonderful tips and ideas, but there was one that absolutely jumped out at me. This is a technique I had never done before: die cut the image and offset the image from the die cut card base.

Peony Spray set

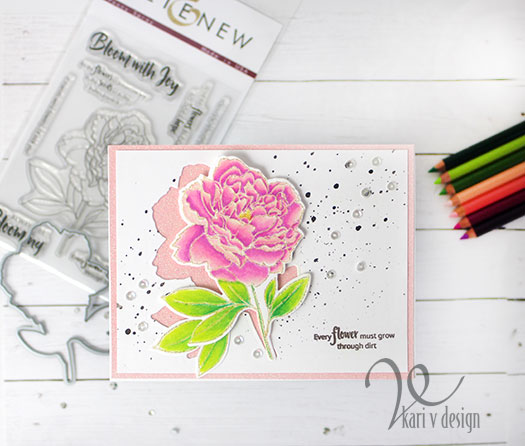
I loved the idea of offsetting the image to show a peek at something below. And of course I had to use a little sparkle with glitter paper! I used a blush glitter paper to match a color in my flower.

Look at that glitter paper…it’s like a promise of something good!

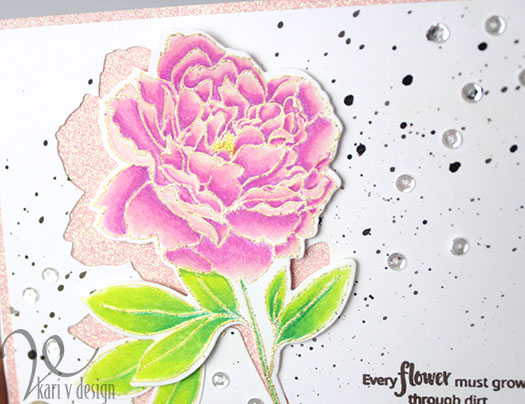
To create this card, I first heat embossed the peony image with glitter gold embossing powder. Then, I colored up my Peony with Prismacolor pencils in these colors: Mulberry (PC995), Process Red (PC 994), Blush Pink (PC918), Light Peach (PC927). For the leaves I used: Grass Green (PC909), Apple Green (PC912), and Chartreuse (PC 989).

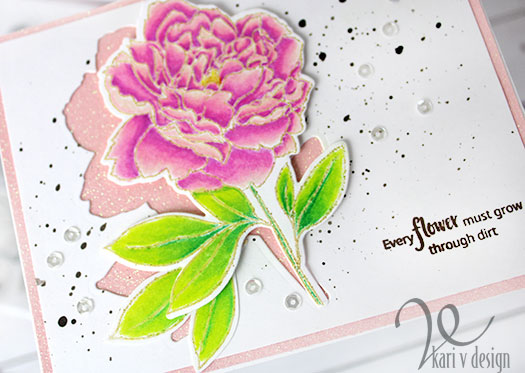
I die cut the image with the matching die. I also colored up two extra leaves. I set those images aside and splattered the panel with a dark brown watercolor paint. Then I stamped the sentiment “Every flower must grow through dirt” in Rich Cocoa ink. Love that sentiment!

I attached the stamped panel piece with liquid glue to the blush pink glitter paper. The glitter paper is cut to an A2 sized card: 4 1/4″ x 5 1/2″ and the stamped panel is just smaller at 4″ x 5 1/4″.

The top flower is popped up with 3M foam tape

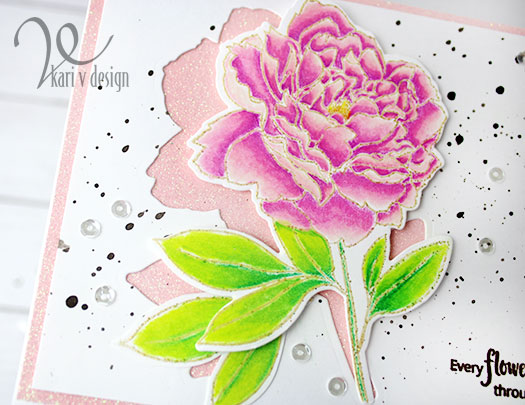
To attach the flower, I used 3M foam tape. (The extra leaves are glued directly to the card panel beneath that popped up flower.)

To finish it all off, I added some Sparkling Clear 4mm sequins. I hope you enjoyed this project today!

I’m often asked what products I’ve used, so I’ve included them below using affiliate links when possible at no extra cost to you. When you purchase through these links, I may receive a small commission. These help me to keep up with my blog and bring you more projects! Thanks for your support.

Thanks for stopping by!

Beautiful peony!
May your days be filled with sunshine,
SHARE

Watercolor Paper to create an underwater Scene

July 12, 2019 Uncategorized

Hello! Today I was inspired by some designer paper that looks like watercolor! It came in the June 2019 Hedgehog Hollow Kit, and I couldn’t wait to create a scene complete with jellyfish.

I have a process video below, or watch it in HD on YouTube:

I think the waves that also came in the kit (as well as the underwater images) are fantastic. I heat embossed the waves with white embossing powder, then fussy cut the top to reveal the stenciled sun rays.

All the images were colored with Copics, and fussy cut to create this underwater scene. The Hello sentiment is from my stash, and is currently a favorite of mine!

A rainbow hello!

For the sand, I used some embossing powder called “Dirty Sand” that I found at Creativation last year. It’s from Emerald Creek and I love it….it really looks like sand! I know that some other companies have since come out with a sand embossing powder, but this was the first one I had ever seen.

I’m often asked what products I’ve used on my cards, so I’ve linked them below, using affiliate links when possible. I couldn’t find the sand embossing powder that I used, so I’ve linked a couple others that I found. When you purchase using one of these links, I may receive a small commission. These help me keep up with blog costs and continue to bring you fun projects. I thank you very much!

Thanks for stopping by!

May your days be filled with sunshine,
SHARE

You are BeeYouTiful

July 8, 2019 Freebies, Paper Crafting

Today I have a quick cardshare, with a new Blonde color combo that I love! This image is from Tiddlyinks and is currently a freebie digital stamp in their shop…go check it out here.

The Copic Colors I used for the hair are YR24, Y21, Y11, Y000. This is a new favorite combo. I’ve been searching for a blonde that’s not too yellow, not too brown, and this one is just perfect!

I had a great time coloring this image. What a cutie!

Thanks for stopping by!

May your days be filled with sunshine,
SHARE

Layering Stamp Ideas

July 5, 2019 Paper Crafting

Hello! Today I have a layering stamp set of Seahorses from the Hedgehog Hollow June 2019 kit.

There are so many beautiful beachy images in this kit: shells, coral, bubbles, fish, etc. But those seahorses really spoke to me! So that is what I used for my very first card make with this kit.

Multi-colored seahorses

I love layering stamps for adding easy color to my cards. Just choose some different shades of ink and start with the lightest color. Then add the darker color over the top for the second layer, and so on. If you don’t have multiple shades, then stamp the ink multiple times to get a darker shade!

I have a process video for you showing you some tips on making LOTS of seahorses for your cards that is oh-so-easy.

Watch it below or on YouTube:

I love using a stamping platform with a ruler for such easy placement and stamping the many layers! So easy and quick.

Those layers!! Solid bottom layer, Detailed second layer in a darker ink

I did fussy cut out these seahorses (above), but the image is easy enough to cut out.

Silver embossed edge

I’m often asked what products I used on my cards, so I’ve compiled a list for you using affiliate links when possible. When you purchase something using these links I may receive a small commission. These help me to keep up with blog costs and bring you more fun projects! Thank you so very much!


I hope I inspired you to try this method on any of your layering stamps! Thanks for stopping by.

May your days be filled with sunshine,
SHARE

Happy 4th of July!

July 4, 2019 4th of July, Holidays, Paper Crafting

Just popping by to wish you a happy 4th of July! Here’s a cute image from Jessica Lynn Originals that I really enjoyed coloring for this day:

This is a digital image that I printed on Neenah solar white and colored up with Copics. I added some distress inks around the edges for the night sky and some star sequins. Hope you enjoyed!

May your days be filled with sunshine,
SHARE
  • « Previous Page
  • 1
  • …
  • 25
  • 26
  • 27
  • 28
  • 29
  • …
  • 120
  • Next Page »
oh hello
sign up
past posts
places i love button
Shop Scrapbook.com
Browse here! Shop Altenew

Shop Ellen Hutson

Like us on Facebook

Awards!

PS-Pro Button
 
 photo HonorableGnome_2013_zps29b8dd8c.jpg
sponsors
wendi lee photography button
sign up

HH Design Team


Photobucket

Instagram:

This error message is only visible to WordPress admins

Error: No connected account.

Please go to the Instagram Feed settings page to connect an account.

I'm going to Blended Conference in Tempe, Arizona in September 2013
THEME BY ECLAIR DESIGNS